Striding Edge: Helvellyn's Grade 1 Ridge Route Guide
Cross Striding Edge, the Grade 1 scramble above Red Tarn, from the Hole-in-the-Wall to Helvellyn's summit, with route stages, exposure and the best conditions.
On this page
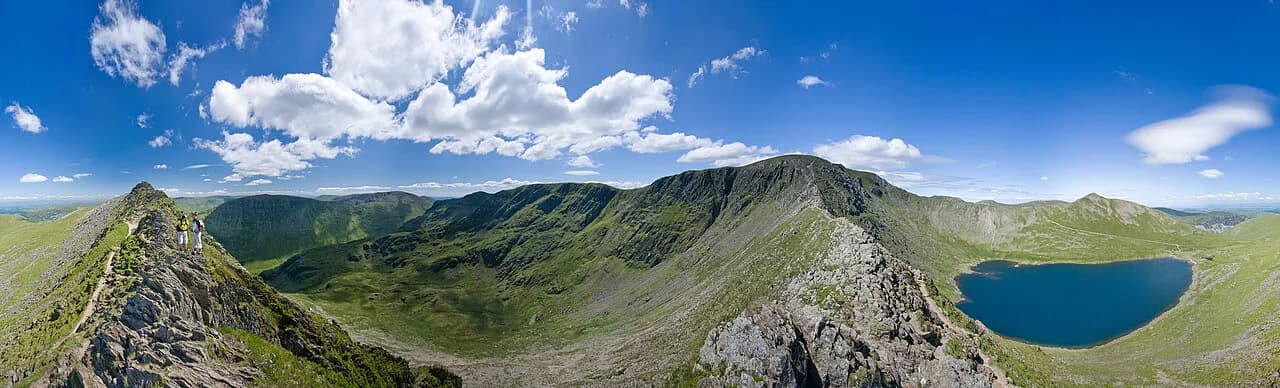
Striding Edge is a rock ridge above Red Tarn that finishes on Helvellyn, and it packs real airiness into a technically modest scramble. The British Mountaineering Council grades it at the top of Grade 1, within reach of competent hill walkers who have a head for heights. If you want a first taste of hands-on ridge terrain without ropes, this is the classic choice in the Lake District.
The day gives you a narrow crest with steep ground falling away on both sides, a short awkward downclimb near the summit and a broad plateau to finish. All of it lies in the eastern fells above Patterdale and Glenridding, so the logistics are simple: one valley, one ridge, one summit. For a wider look at alternatives across the national park, our guide to hiking in the Lake District sets out other valleys and summits.
What Striding Edge offers and who it suits
The ridge rivets onto the eastern side of Helvellyn and gives continuous views across Red Tarn and the crags of Nethermost Cove. Its character is narrow and rocky rather than vertical, and the scrambling sits at the lower end of Grade 1. Walkers who are steady on rough ground and confident with exposure will find it manageable in dry, calm weather. If you are weighing up comparable ridge days elsewhere, the Scotland hiking guide covers similar terrain.
It is not the day for anyone who suffers from vertigo, because the drops on both sides are constant and the crest leaves little room to step aside. Basic hill walking skill is enough otherwise, including map and compass work, since the summit can sit in cloud. Think of it as a mountain day with scrambling sections rather than a rock climb, and the fitness and kit you already use for a long fell walk will carry you through.
Where the route starts and ends: Patterdale, Glenridding and the Hole-in-the-Wall
Most crossings begin from Patterdale or Glenridding on the valley floor and climb to the Hole-in-the-Wall, the stile at around 700 m (2,300 ft) where the ridge approach begins. From there the route runs west toward High Spying How and the crest beyond it. The day ends on Helvellyn's summit at 950 m (3,117 ft), so the descent is a separate decision made on the plateau.
From Patterdale, the approach climbs steadily above Grisedale before reaching the wall, and it is the more direct line. From Glenridding, the usual route gains Birkhouse Moor first and then joins the same eastern approach. Both give you a full mountain day with the ridge in the middle, and the return options from Helvellyn lead back down to the same valley.
Getting to the trailhead: parking, buses and approach options
Patterdale and Glenridding are small villages at the head of Ullswater, and parking fills up quickly on fine weekends. Arrive early and use village car parks rather than roadside verges, and treat the buses along the valley as a way to leave a car at the finish if you plan a one-way descent. Timetables change by season, so the operator's own site is the place to fix your times before you commit.
There is no lift on this side of Helvellyn, so every metre of the 260 m (853 ft) ridge ascent and the valley climb before it is on foot. Build in the walk back from the summit instead of planning on being back at the car quickly. If you want a lower, gentler introduction to the area on another day, the catbells walk above Derwent Water is a good contrast.
Distance, ascent and time
The ridge itself runs almost 2 km (1.2 mi) with roughly 260 m (853 ft) of ascent from the approach to High Spying How. The round trip to Helvellyn and back to the valley is about 8 km (5 mi), which puts the whole day into proportion. Allow five to six hours in summer conditions and seven to eight hours when winter daylight and slower ground come into play.
Those hours include the valley approach, the ridge crossing and the descent, not just the scramble. A fit walker moving well can be quicker, but the Chimney and any queue of walkers will slow the crest, and cloud on the summit adds navigation time. Plan to be off the high ground before dusk, and carry a headtorch as insurance in short winter days.
Route description: Hole-in-the-Wall to High Spying How
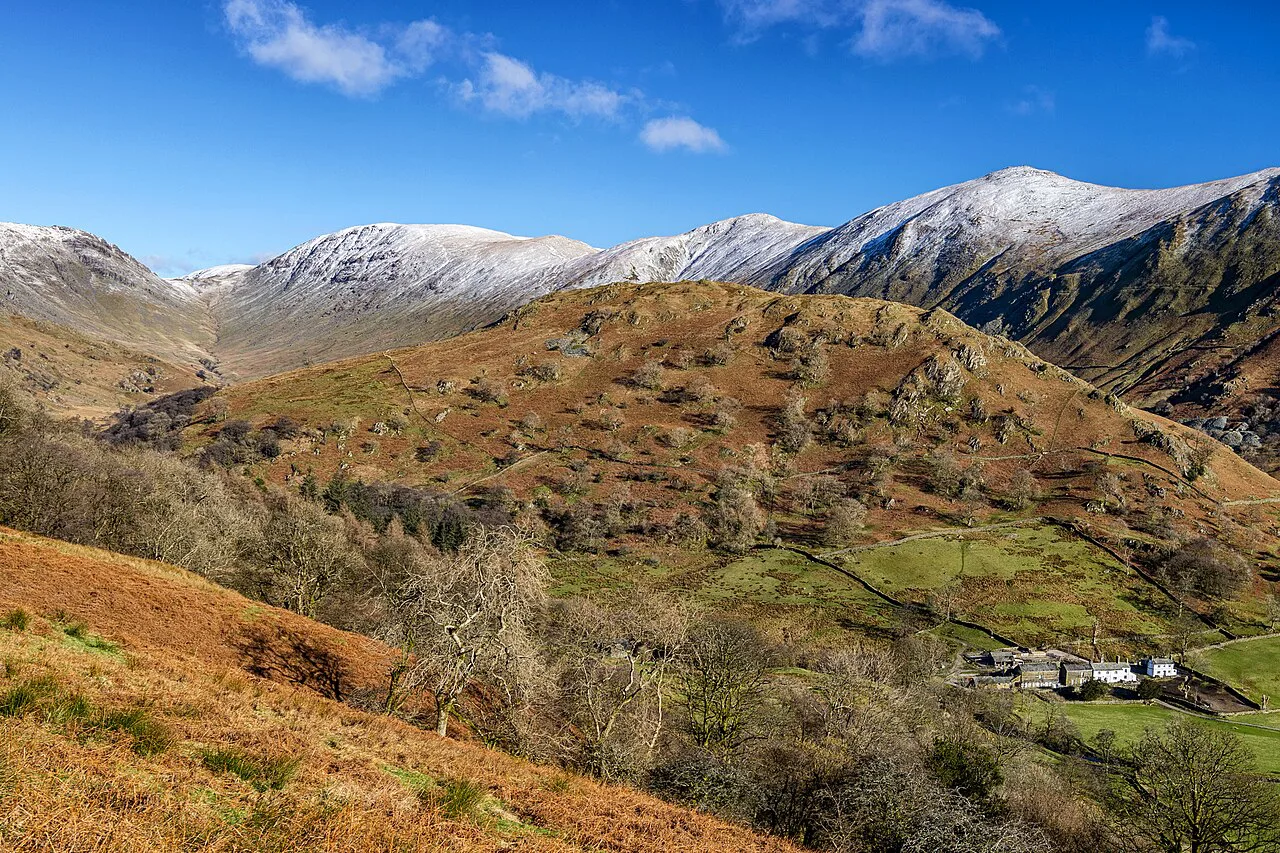
Beyond the Hole-in-the-Wall the ground is broad and rises steadily, with Red Tarn opening up below to the north and the crags of Nethermost Cove across the corrie. There is little sense of exposure at first, which makes this a relaxed start and a good place to settle your pace. The ridge line reveals itself ahead as you gain height.
The approach culminates at High Spying How at about 863 m (2,831 ft), the highest point of the ridge before the true traverse. From here the crest narrows and the character changes at once. Pause, eat something and check the wind before you commit, because turning back is straightforward on this side and much less so once you are on the arête.
Route description: the narrow crest and the lower Red Tarn path
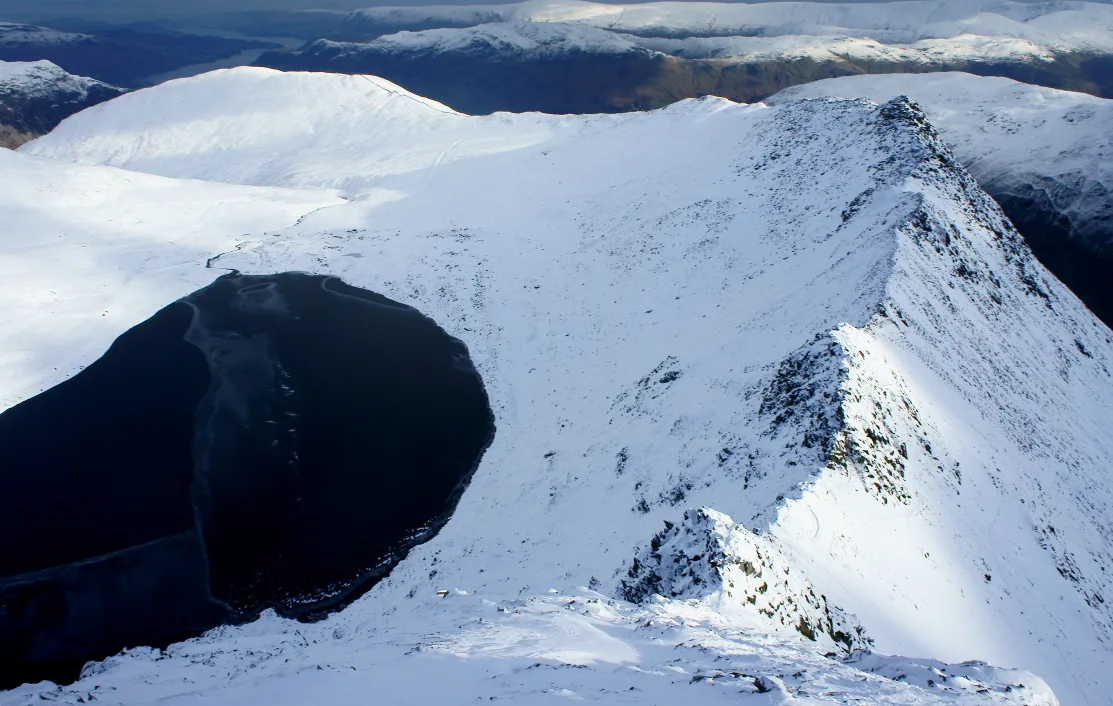
The classic line follows the crest itself, rising and falling over rocky steps where using your hands feels more natural than staying upright. Exposure is continuous, with steep ground on both sides, and the scrambling stays straightforward in good conditions. Wind, rain and wet rock raise the stakes far more than the technical difficulty does.
A lower path runs beneath parts of the crest, mainly on the Red Tarn side, and it skips some of the hands-on scrambling and the most exposed positions on the skyline. It remains a steep, rough mountain path with real drops, so treat it as a moderated line rather than a safe exit. Choosing it is a fair decision if the exposure is getting to you, and nobody on the ridge will think less of it.
Route description: the Chimney (Bad Step)
Toward the Helvellyn end, the crest ends at the Chimney, also called the Bad Step, a rock tower of around 7 m (23 ft) that must be downclimbed on the usual east-to-west crossing. The holds are there, but climbing downward hides your feet and makes the exposure feel sharper. This is the most technically awkward section of the route.
Face into the rock, test every hand and foothold and ignore any pressure from walkers behind you. Wet or icy rock, strong wind and loose stone turn an easy move into a serious one, and an experienced companion descending first can point out footholds from below. A line on the Red Tarn side avoids the hardest part of the descent, but it still crosses steep exposed ground.
Route description: the final climb onto Helvellyn's summit plateau
Past the Chimney, a final rocky headwall leads to the summit plateau, and the obvious broken line up the middle climbs more easily than it looks from below. Detouring left onto the scree is a common mistake and makes for looser, more tiring ground. The reward is sudden: after the narrow crest you emerge onto the broad plateau with the summit shelter and cairn close by.
Turn around here to take in the whole length of the ridge, with Red Tarn below, Catstycam beyond and Swirral Edge enclosing the north side of the corrie. The view is the best argument for having crossed the ridge in this direction. From the plateau you can then pick your descent, which is where the day's second decision comes.
Which direction to cross, and descent options via Swirral Edge or Glenridding
East to west is the traditional direction, running from the Hole-in-the-Wall over High Spying How and the crest to the Chimney and Helvellyn. It gives a natural progression with the hardest move near the end, when you are warmed up. Some walkers find climbing up the Chimney easier than downclimbing it, but travelling west to east means meeting most other walkers head-on on a narrow, busy ridge.
For the return, a straightforward hill path runs north off Helvellyn back to Glenridding, which suits anyone who has had enough exposure for one day. If you want more scrambling, descend Swirral Edge instead; its ridge is shorter and more straightforward, though coming down makes it feel comparable to Striding Edge. Continuing over Catstycam gives the classic round of Red Tarn.
Exposure, scrambling grade and the conditions that change the day
Striding Edge sits at the lower end of Grade 1, below harder classics that demand ropework. The challenge is situation rather than moves: constant exposure on both sides, a downclimb with consequences and ground where a slip matters. Avoid the ridge in strong wind, and treat rain, ice, snow and poor visibility as reasons to change plans, since they can make it serious very quickly.
Carry a physical map and compass and know how to use them, because the summit is often in cloud and phones can fail. Serious falls have happened near the bad step, particularly when conditions are poor or walkers are rushed. Steady judgment counts for more than speed on this ridge.
Best months and what snow and ice mean for the ridge
Dry, clear summer and early autumn days give the best conditions: rock is reliable, days are long and the crest can be taken at a relaxed pace. Late spring is quieter but snow can linger on the higher ground, so check what is underfoot before committing to the crest. The ridge is often busiest on fine weekends and bank holidays, so an early start buys both parking and space on the arête.
In winter, Striding Edge becomes a winter mountaineering objective, with appropriate skills and equipment needed for snow and ice. Even outside winter, ice in the Chimney changes the descent completely. If you are unsure, pick a day when the mountain forecast is settled and the rock is dry. Anyone working toward the fell summits will find the broader picture in our guide to The Wainwrights.
Kit: boots, map and compass
Ordinary walking boots are the right footwear, because much of the ridge is walked rather than climbed and the scrambling does not need specialist rock shoes. Take a waterproof shell, warm layers and gloves for the plateau, plus food and water for a full day out. A helmet is not standard here but is a reasonable choice for nervous first-timers on the crest.
Navigation kit matters on a summit that often cloud-caps, so carry the map and compass even if you rely on a phone. A small first aid kit and an emergency shelter belong in the pack on any Lake District ridge day. Leave your route plan with someone and set a return time before you leave the valley.
Plan Your Visit
Striding Edge is the right first scramble for a hill walker who wants exposure without ropework: a narrow crest, a short awkward downclimb and a summit plateau to finish, all from Patterdale or Glenridding. Go east to west, choose a dry and calm day, and treat the Chimney with patience and care. Build the day around five to six hours in summer and plan your descent before you reach the summit.
If you want a lower and quieter day in the same national park, the Fairfield Horseshoe Hike above Rydal Water gives long ridge walking without the hands-on element. Both routes reward an early start and a settled forecast, and both put you back in the valleys by evening.
Frequently Asked Questions
How difficult is Striding Edge?
It is a Grade 1 scramble at the easier end of that grade, so competent hill walkers with a head for heights can manage it in dry, calm weather. The technical moves are modest, but the exposure is continuous and the seven-metre downclimb at the Chimney is the most awkward section. Map and compass skills matter because the summit is often in cloud.
How scary is Striding Edge and is there an easier way around?
The narrow crest has steep drops on both sides, which makes it unsuitable for anyone with vertigo. A lower path on the Red Tarn side avoids the most exposed skyline positions and some hands-on scrambling, though it stays a steep rough mountain path. A line on the same side also bypasses the hardest part of the Chimney descent.
What is the hardest part of Striding Edge?
On the usual east-to-west crossing, the Chimney near the Helvellyn end is the hardest move: a rock tower of about seven metres that must be downclimbed. The holds are good, but descending hides your feet and amplifies the exposure. Wet, icy or windy conditions make it considerably more serious.
Should you cross Striding Edge east to west or west to east?
East to west is the traditional direction, starting from the Hole-in-the-Wall and finishing on Helvellyn after the Chimney. Some walkers find climbing up the Chimney easier than descending it, but a west-to-east crossing meets most other walkers head-on on a narrow, busy ridge, which is why the traditional direction suits a first attempt.
How long does it take to hike Helvellyn via Striding Edge?
Allow about eight kilometres round trip from the valley, taking five to six hours in summer conditions and seven to eight hours in winter. The ridge itself is almost two kilometres with around 260 metres of ascent. Queues at the Chimney and navigation in cloud can add time.
Where do you start the walk to Striding Edge?
Most walkers start from Patterdale or Glenridding and climb to the Hole-in-the-Wall at around 700 metres, where the ridge approach begins. From Patterdale the route climbs above Grisedale; from Glenridding it usually goes over Birkhouse Moor first. Both villages sit at the head of Ullswater.
Do you need special equipment for Striding Edge?
Ordinary walking boots are the right choice, since much of the ridge is walked and the scrambling is not demanding enough to need rock shoes or ropes. Carry waterproofs, warm layers, a map and compass and food for a full day. In winter conditions, treat it as a winter mountaineering route with the skills and kit that implies.
When is the best time to cross Striding Edge?
Dry, clear days in summer and early autumn give the most reliable rock and the longest daylight. Late spring is quieter but snow can linger on high ground, and winter brings snow and ice that change the objective entirely. Wind is the most common reason to postpone the ridge.
Sources
Trail notes for your next trip
Optional updates when we add or revise hiking guides.
You might also like
Continue reading
More guides you'll find useful